Header 1st and Header All Tabs |
  
|
Header 1st and Header All Tabs |
|
Based on the information gathered, configure the Header (1st) and/or Header (All) tabs. Header (1st) will only appear on the first page, and Header (All) will appear on all subsequent pages, or all pages if Use Different First Page Header is not selected. See Formatting Tab. The toolbar across the top is very similar to the toolbars used in word processing programs. You can have information in a table if needed by selecting the Table menu, then Create Table. To add any pertinent patient or provider information, select Insert Field.
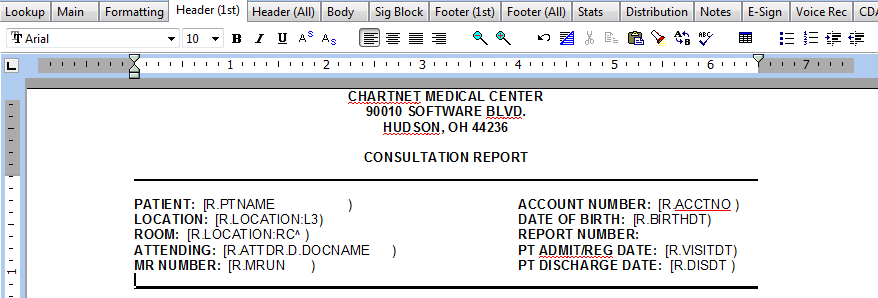
This header uses a Graphic image for the lines above and below the patient/provider information. The steps for adding graphics are outlined below:
| 1. | Save your graphic as either a .jpeg or .bmp image into the C:\\ChartNet\Serial_XX\SYSTEM\SITES\YYYY where XX equals the Serial # for your ChartNet system and YYYY equals the site that will be using the graphic. |
| 2. | You will need to click on Site Graphics button located on the left of the screen and select Upload Site Graphics Templates to Host to upload these to your ChartNet server. If the graphic is not uploaded, end users will not see it. |
| 3. | Under the Insert menu, select Graphic (as linked file) or Graphic (as embedded file). For smaller graphic images, embedded is recommended. |
This header is also using fields for the patient name [R.PTNAME), Medical Record Number [R.MRUN), Account Number [R.ACCTNO) and the Admit Date [R.VISITDT). These fields can be inserted by selecting Insert Field at the bottom left of the screen.
NUMBER OF CHARACTERS IN HEADER TO ADD TO A REPORT CHARACTER COUNT: By default, header characters are not included in line counts. If you are billing and/or paying for headers, under the Header (All) tab, the number of characters is populated (this value can be changed). Headers need to be included in the billing and/or payroll Calculation Code.
Please refer to the Toolbar section below for information regarding the toolbar functionality.